Step-by-Step Guide: Setting Up and Running evi-run on DigitalOcean or Other VPS (for Beginners)
Introduction
evi-run is a ready-to-deploy multi-agent AI system built on the OpenAI Agents SDK. The system provides powerful artificial intelligence capabilities through a convenient Telegram bot interface and supports operating modes from personal use to commercial applications.
Key Technical Characteristics
- Architecture: Multi-agent system with main agent, specialized sub-agents and tools
- Backend: Python, OpenAI Agents SDK, FastAPI
- Database: PostgreSQL for data + Redis for caching
- Interface: Telegram Bot API
- Containerization: Docker Compose for service orchestration
- Integrations: MCP servers, Solana RPC
System Requirements
Minimum Requirements for DigitalOcean Droplet
- CPU: 1 vCPU
- RAM: 1GB
- Storage: 25GB SSD
- OS: Ubuntu 22.04 LTS
- Network: 1TB Transfer
Required API Keys


Carefully find the bot in the list, check all the characters in the name.

Step 1: Creating and Configuring DigitalOcean Droplet
Use any Droplet creation guide or refer to the official Droplet Quickstart documentation if you encounter difficulties.
Creating a Droplet
-
Log into the DigitalOcean panel and click “Create → Droplets”
-
Choose the operating system image:
- Distribution: Ubuntu
- Version: 22.04 (LTS) x64
-
Select Droplet size:
- Minimum: Basic Plan → Regular → $6/mo (1GB RAM, 1 vCPU, 25GB SSD)
- Or higher, depending on expected load
-
Configure authentication:
- Set a strong root password
- Or use SSH Key
-
Additional settings:
- Hostname:
evi-run-server - Enable monitoring (optional)
- Enable backups (optional)
- Hostname:
-
Create Droplet – the process will take 1-2 minutes
Connecting to the Server
Option 1: DigitalOcean Web Console (recommended for beginners)
- In the DigitalOcean control panel, go to your Droplet
- Click the “Console” button in the top right corner
- Wait for the web terminal to load
- Log in as
rootwith the password you specified during creation
Option 2: SSH through terminal
Paste password with right mouse click in one press, password will not be displayed in the input line, just press Enter.

Initial Setup
Update the system and install necessary utilities:
Execute commands one by one (line by line), copy the line and paste into console with right mouse click.

apt update && apt upgrade -y
apt install -y curl wget git nano
Wait for commands to complete until the input prompt appears.
Step 2: Installing Docker and Docker Compose
evi-run has an automated Docker installation script:
# Navigate to working directory
cd /opt

# Clone the repository
sudo git clone https://github.com/pipedude/evi-run.git

# Set access permissions
sudo chown -R $USER:$USER evi-run
cd evi-run
Run the automatic Docker installation:
# Make script executable
chmod +x docker_setup_en.sh

# Run installation (requires sudo)
sudo ./docker_setup_en.sh
Step 3: Configuring evi-run
Environment Variables Setup
Copy and edit the environment file:
# Copy example configuration
cp .env.example .env

# Edit configuration
nano .env
Fill in the required parameters in .env:
# REQUIRED: Telegram bot token from @BotFather
TELEGRAM_BOT_TOKEN=your_bot_token_here

# REQUIRED: OpenAI API key
API_KEY_OPENAI=your_openai_api_key
Insert your token and key instead of XXX, without quotes or other formatting

How to save file in nano:
- Press
Ctrl + Xto exit - Press
Yto confirm saving - Press
Enterto confirm filename
Main Configuration Setup
Edit config.py:
nano config.py
Required parameters to change:
# REQUIRED: Your Telegram ID from @userinfobot
ADMIN_ID = 123456789

# Admin list (optional, add user IDs who will have admin privileges)
ADMINS_LIST = [123456789, 987654321]

# Operating mode: 'private', 'free', or 'pay'
TYPE_USAGE = 'private'  # Start with private for testing

How to save file in nano:
- Press
Ctrl + Xto exit - Press
Yto confirm saving - Press
Enterto confirm filename
Agent Configuration Setup (Optional)
Step 4: Building and Running the System
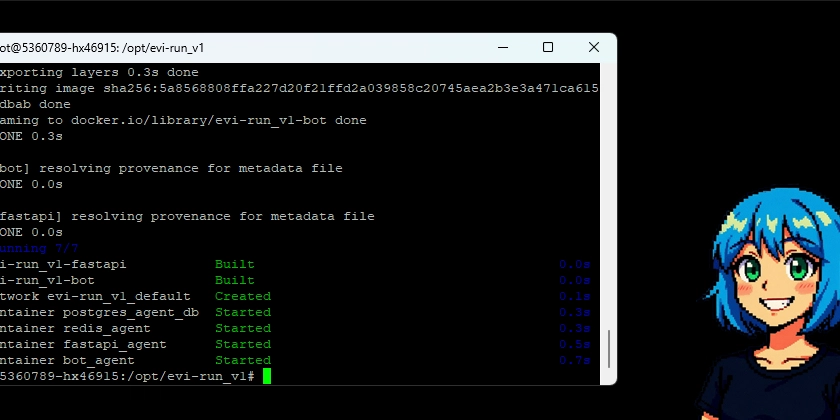
Building Containers and Starting the System
# Build all services
docker compose up --build -d
Expected output:

Step 5: Testing Functionality
Testing the Telegram Bot
- Find your bot in Telegram by username – see in @BotFather
- Send the
/startcommand - Try a simple request, for example: “Hello, how are you?”

Additional Information
Useful Commands
System restart (after code changes):
cd /opt/evi-run
docker compose down
docker compose up --build -d
System shutdown:
cd /opt/evi-run
docker compose down
Viewing logs:
# All system logs
docker compose logs -f

# Specific service logs
docker compose logs -f bot

# Logs from the last hour
docker compose logs --since 1h bot
Conclusion
After completing all steps, you will have a fully functional multi-agent AI system evi-run running on VPS. Now start configuring your system in detail. Have a good coding experience! 💜
Useful Resources
Community and Support
This article was written for beginners in the technical community on DEV who are interested in deploying AI systems. Questions and suggestions for improvement are welcome!