How To Run Deepseek R1 671b Fully Locally On a $2000 EPYC Server – Digital Spaceport
Deepseek Ai Rig Build for Local Inference
Let’s start with the good news. I got very solid performance off the same baseline AMD EPYC Rome system that has been at the core of our entire journey 😁 That initial parts selection has remained fantastic! Owners of that system are going to get some great news today also as they can hit between 4.25 to 3.5 TPS (tokens per second) on the Q4 671b full model. This is important as the distilled versions are simply not the same at all. They are vastly inferior and other models out perform them handily. Running the full model, with a 16K or greater context window, is indeed the pathway to the real experience and it is worthwhile. Since this runs decent enough on CPU alone it also can hang out while you run smaller models, like vision models, at the same time. To reiterate, this will not fully run in only GPU VRAM alone unless you have a massive rig. I will show you all the tips and tricks to get this working. It is not “easy” but if you like tech tinkering it is a lot of fun.
Local AI CPU Compute Hardware
If you followed the original build guide for quad 3090s I put out, you are in luck. That 7702 still packs a punch. I will recommend a better CPU as it is now in that same price bracket and performance should be a good deal better, but these results you see are from the 7702 in my machine. The MZ32-AR0 was also a very good board recommendation to start with as well as it lowers the price of hitting 512GB to 1TB of System Ram dramatically with 16 dimm slots that can run at a full 3200 speed. The ram I am running is actually 2400 DDR4 dimms but you would likely get additional performance improvement by going with 3200 speed DDR4 ECC dimms. 16x 32GB dimms gets you to 512 GB. 16x 64GB dimms gets you to 1TB RAM. You cannot mix LRDIMM and RDIMMS!
Local Ai Rig Components
(Prices as of 1/29/2025)
Total Cost: Around $2000 if you use 512GB 2400 RAM and EPYC 7702. I would get the 7C13 or 7V13 vs upgraded speed of RAM. Getting 768GB RAM would be my second choice in upgrade and finally getting 3200 RAM would be the last option I would do. If you price it in at the top with the 7C13 or 7V13 and 1TB DDR4 2400 it’s more like $2500.
Rig Rack Assembly
Assembly is as it was in the prior video still minus GPUs and Risers. If you are going to add in GPUs later, I would recommend getting a 1500w or 1600w PSU up front. The rest all stays the same if you add in GPUs and Risers. You can watch that video from here. Just ignore the GPU parts of this video, the rest is the exact same.
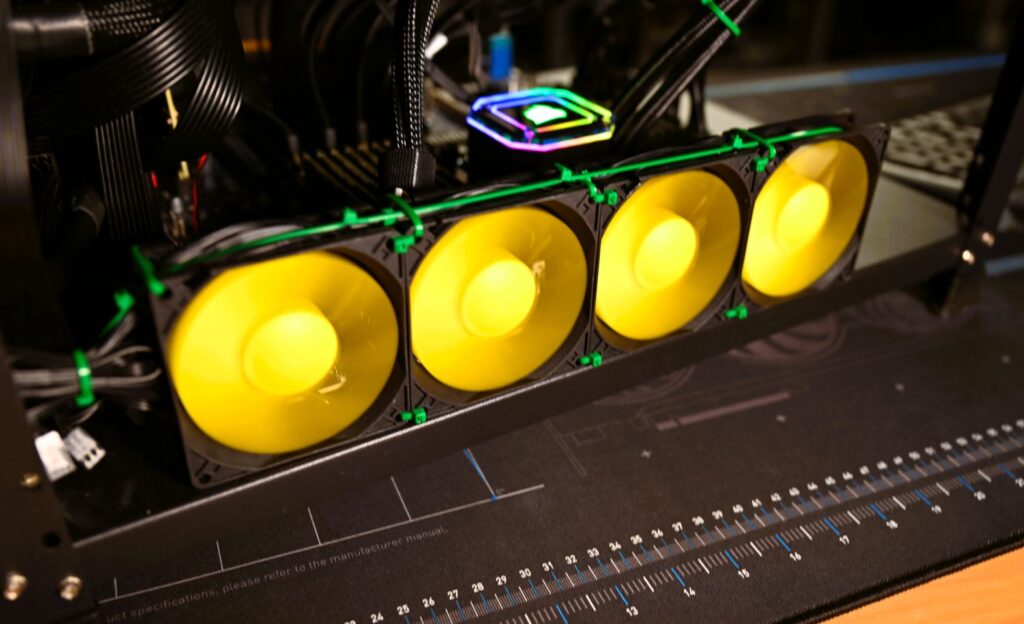
Additionally, you want to get a little fan wall made and zip tied together that blows directly over the RAM sticks to keep them cooler. They will not melt but they will thermally throttle and impact performance negatively as you churn data in them nonstop. I used 4x 80mm little ones.

Motherboard Upgrades Notes
You are better off buying a V3 version of the MZ32-AR0 motherboard vs getting V1 and upgrading it if you are going with the AMD EPYC 7V13. The V1 may not out of the box support a Milan CPU until it is at V3, so you would need a V2 CPU possibly. I can not confirm that but I suspect it is likely. You can upgrade the V1 to the V3 in my experience by using the bios updates to jump a V1 board all the way up to the latest version, then grabbing a V3 early bios update and running that. Then you can update to later V3 bios versions from that page. Current as of time of writing is M23_R40 bios revision.
Local AI Self Hosted Software Setup
This is where things get a bit on the tricky side vs the prior guides I have used. Yes you can deploy Ollama on a bare metal proxmox installation. Should you? Not ideally, no. You have two options at this point and I will show you one of them now. I need to test and see performance impacts before I recommend the other, but running Ollama inside a stand alone LXC or VM is the other option. If you have followed my prior LXC and DOCKER guide, follow along with this but install in a VM is my advice for now. I will be working on a more unified approach to get this all working in our happy little Ai server self contained environment but that will take time.
Install Our Ubuntu 24 on Bare Metal or Proxmox VM?
Basically you should install this on a bare metal Ubuntu 24.04 server base if you want to eliminate extra things and are setting this up new and fresh, or follow the prior proxmox guide. You have to make this call yourself and live with the results. You can install a desktop if you want but its not needed nor will I demonstrate that. You are running services on top of a server, the CLI is not to be feared at all.
Setting up your BMC MZ32-AR0
Connect your MZ32-AR0 ethernet and BMC ports to your local network. If you have a firewall router, like opnsense or pfsense, you can check your ARP for your port to show up. Grab that ip address. In my instance it was https://192.168.1.XX and when I log in it asks for a username and password right off the bat. The default username is admin. The password should be a sticker on YOUR motherboard under the MZ32-AR0 stamp. Here is mine pictured. It is the barcode bearing label. I forget exactly but it’s something like removing the first 3/C/ part and the next 6 or possibly 11 characters are the initial password. When you log in finally, go to
Home > Settings > Network > Network IP Settings
and set a static IP for your board. Also set a DNS locally if you use that and a NTP server. You will log into this interface often so bookmark it or something.

Next go to the remote control on the sidebar. It will land you on a page that has HTML5 viewer as an option. I would recommend doing this from a wired connection since we will be sending a large ISO over the network to install Ubuntu 24.04 in a bit. Grab the server version of an ISO of ubuntu 24 their download page. Its like 2.5GB. Connect it to your HTML5 viewer in the upper right side.

Once you click start it will spool up a bit. You should turn on the server now if you have not yet. Once it is up and running it will start counting up the little KB number. Click into the “screen” section and wait for the Gigabyte logo to show up. Hit DEL and go into the bios. Set everything to defaults and then save and close. When it reboots enter the BIOS again. This time we are going to change some settings. First specify your boot drive. You can leave this as UEFI if you want, it doesn’t really matter but Legacy mode is less headaches potentially if you have a drive issue.
Here are the settings you are going to hunt down and change.
- NPS to 1
- CCD to Auto
- SMT turn off
- SVM off (or on if you are running in proxmox/virtualizing, minor performance hit)
- IOMMU off (or on if you are running in proxmox/virtualizing, minor performance hit)
- cTDP adjusted to 200 (for 7702)
- deterministic control manual, then slider is performance
- quick power policy performance
- BoostFMax manual
- boostFmax 3400 (for 7702)
Finally after you have made these changes save and reboot once again from the bios. This time hit the F12/11/10 (I forget, it shows on the bootlogo page bottom) to enter the bios boot selection. Select the AMI virtual CD option. If you are on wired it should get you to the Ubuntu boot screen fast. Go ahead and install. Set a username and password you will not forget. Ensure you check the box that says “setup ssh server” so you can remote in once it is installed. It will install. It will reboot and you have to hit enter to proceed at the end. When it finishes rebooting it should be back to a terminal asking for your user: enter your username and password. type
and remember your ip address. You can now go back to your terminal software in windows/osx/linux on your desktop and close the HTML5 viewer. In window in your terminal replacing with your info type:
Install additional software packages
Here is a blob of cmds to run. I am omitting the GPU stuff but if you have NVIDIA GPUs then you can at the end of this go install those
sudo apt update && sudo apt upgrade -y && sudo apt install -y htop git glances nano lsof unzip
Set a static IP address
From the CLI type:
Then you will have a default config you can edit by using
sudo nano /etc/netplan/50-cloud-init.yaml
It will look like this originally. We will be editing eno1. That is the physical RJ-45 network plug on the motherboard. Ignore my enp65s0np0 that is an add in network card.

Use the arrow keys and type it up to look something like this. Just use whatever IP address you are already on to make it easy for now and to not complicate things. Im using 200 as my static IP in this instance and my router is on 192.168.1.1 which is common.

Now we have to save this netplan type CTRL-X and then Y
Now you will exit back to the terminal. Type
and you now have your network set to static. You can reboot and ssh in again to make sure now.
Install Ollama
Next we will install OIlama
curl -L https://ollama.com/download/ollama-linux-amd64.tgz -o ollama-linux-amd64.tgz
sudo tar -C /usr -xzf ollama-linux-amd64.tgz
sudo useradd -r -s /bin/false -U -m -d /usr/share/ollama ollama
sudo usermod -a -G ollama $(whoami)
This creates a Ollama user also and installs the ollama into /usr/share/ollama folder. FYI by default Models will live in /usr/share/ollama/.ollama/models/
Setup Environment Variables and Service
Now we need to setup some env variables that will run when ollama starts up. This is critical to getting the parallel issue resolved.
sudo nano /etc/systemd/system/ollama.service
and in we will be adding additional lines with environment variables. Here is a list of all the variables. We will NOT be using them all just a quick reference to what they are.
Environment Variables:
-OLLAMA_DEBUG Show additional debug information (e.g. OLLAMA_DEBUG=1)
-OLLAMA_HOST IP Address for the ollama server (default 127.0.0.1:11434)
-OLLAMA_KEEP_ALIVE The duration that models stay loaded in memory (default “5m”)
-OLLAMA_MAX_LOADED_MODELS Maximum number of loaded models per GPU
-OLLAMA_MAX_QUEUE Maximum number of queued requests
-OLLAMA_MODELS The path to the models directory
-OLLAMA_NUM_PARALLEL Maximum number of parallel requests
-OLLAMA_NOPRUNE Do not prune model blobs on startup
-OLLAMA_ORIGINS A comma separated list of allowed origins
-OLLAMA_SCHED_SPREAD Always schedule model across all GPUs
-OLLAMA_FLASH_ATTENTION Enabled flash attention
-OLLAMA_KV_CACHE_TYPE Quantization type for the K/V cache (default: f16)
-OLLAMA_LLM_LIBRARY Set LLM library to bypass autodetection
-OLLAMA_GPU_OVERHEAD Reserve a portion of VRAM per GPU (bytes)
-OLLAMA_LOAD_TIMEOUT How long to allow model loads to stall before giving up (default “5m”)
Here is what mine looks like after setting this up. You DO NOT need (nor want) to enter the GPU variables in unless you have GPUs.

CNTRL-X and Y to save. You then need to type:
sudo systemctl daemon-reload
sudo systemctl start ollama
nproc
and you are now variable wise looking good. nproc should have output the number 64. If it put out 128 you need to disable SMT. If it put out 32 or 96 you need to check your NPS and CCD settings. If it is 64, LFG.
Pull down Deepseek 671b model
Now lets pull the ollama guff deepseek 671b down. This will eat up like 400GB of disk space. I hope your NVMe is decent.
ollama pull deepseek-r1:671b
That will take a while. Take a moment to think of that egress bill…
Install OpenWEBUI
We need to run this in either docker or in python. I will deploy this for you in docker here. Ensure we dont have garbage installed that will conflict.
for pkg in docker.io docker-doc docker-compose docker-compose-v2 podman-docker containerd runc; do sudo apt-get remove $pkg; done
Install Docker Repo
# Add Docker's official GPG key:
sudo apt-get update
sudo apt-get install ca-certificates curl
sudo install -m 0755 -d /etc/apt/keyrings
sudo curl -fsSL https://download.docker.com/linux/ubuntu/gpg -o /etc/apt/keyrings/docker.asc
sudo chmod a+r /etc/apt/keyrings/docker.asc

# Add the repository to Apt sources:
echo \
  "deb [arch=$(dpkg --print-architecture) signed-by=/etc/apt/keyrings/docker.asc] https://download.docker.com/linux/ubuntu \
  $(. /etc/os-release && echo "$VERSION_CODENAME") stable" | \
  sudo tee /etc/apt/sources.list.d/docker.list > /dev/null
sudo apt-get update
Install Docker Itself finally
sudo apt-get install docker-ce docker-ce-cli containerd.io docker-buildx-plugin docker-compose-plugin -y
Install Dockge Docker Container Manager.
Your data dir is inside /opt/dockge in this instance for docker and dockge, an easy to use interface.
sudo mkdir -p /opt/stacks /opt/dockge
cd /opt/dockge
sudo curl https://raw.githubusercontent.com/louislam/dockge/master/compose.yaml –output compose.yaml
docker compose up -d
Now you can go to your docker manager to complete the rest of the steps. If you do not know the IP address of the LXC check your networking settings for the container. Then append :5001
http://192.168.1.200:5001 for instance is my address. You will need to set a username and password on the first visit. Please write this down. Now you are ready to start creating your docker container for OpenwebUI.
Paste this in as your compose for your openwebui
version: “3.3”
services:
open-webui:
ports:
– 7000:8080
volumes:
– open-webui:/app/backend/data
container_name: open-webui
restart: always
image: ghcr.io/open-webui/open-webui:latest
volumes:
open-webui:
networks:
dockge_default:
external: true
Hit save and run. It will pull this down on the first time and you can in the future click update to update it easy. After this shows as running, browse to the IP:7000 for your machine. Mine is http://192.168.1.200:7000 in this instance. It will have you setup credentials. Again make good note of these. We are ALMOST done now! Whew!
Connect OpenWEBUI to Ollama
Use the + in the /admin/settings view for connections to add the local server. In this instance it is 192.168.1.200:11434 but use your values. It should give you a green popin thing “connection success”

You can click the manage icon and it will look like this in the delete dropdown once you have finished downloading the LLM model for Deepseek.

Congrats. Home stretch! But don’t leave the settings view yet!
Set Advanced Parameters
Click this pen icon.

Now you can edit advanced params and DO NOT FORGET TO SAVE!
Change the GPU to 0 if you have none attached.
Reasoning Effort low (medium and high are also options, medium default)
Context Length 16364 (16K fits, but higher needs either more RAM or GPUs)
num_thread 62 (I leave a few free)
use_mlock you might want to enable to prevent ram paging to disk
and the rest you can play with or pull from the model card. You CAN’T use the full ~160K context size unless you have like 2 TB RAM…and it would be slower, like, a lot slower.
DON’T FORGET TO HIT SAVE!
Set User Settings
You can update your user preferences how you want, but set the the keep alive to like 3h. Hit save.

It is a bit weird but this is user settings, the prior was admin settings.
Run a Test
Holy cow you got here! Nice job, I am impressed! Click new chat in the upper left of the window. Deepseek-r1:671b should be there already. Give it a hello. Nice job!
Benchmarking Deepseek R1 671b
In conclusion, we installed a fully functional bare metal Ollama + OpenWEBUI setup. I am SURE there are a lot of other great runners out there like llama.cpp, exo, and vLLM but those will be separate guides when I get a decent handle on working them. Llama.cpp is likely first as I have done a compile, bench and run recently and it all worked out very nice! Lot of knobs on that one. vLLM is a mess of a thing and exo is simple but keeps crashing after I start it. No time to debug those things yet, but as they say…. SOON!