Pimping my Casio with Oddly Specific Objects’ alternate motherboard and firmware
Some time ago I bought a replacement motherboard for my classic Casio F-91W from Crowd Supply. The project keeps the original Casio LCD but replaces the entire motherboard with a modern microcontroller and open firmware. The combination gives you long battery life but lots of new functionality in a classic case.
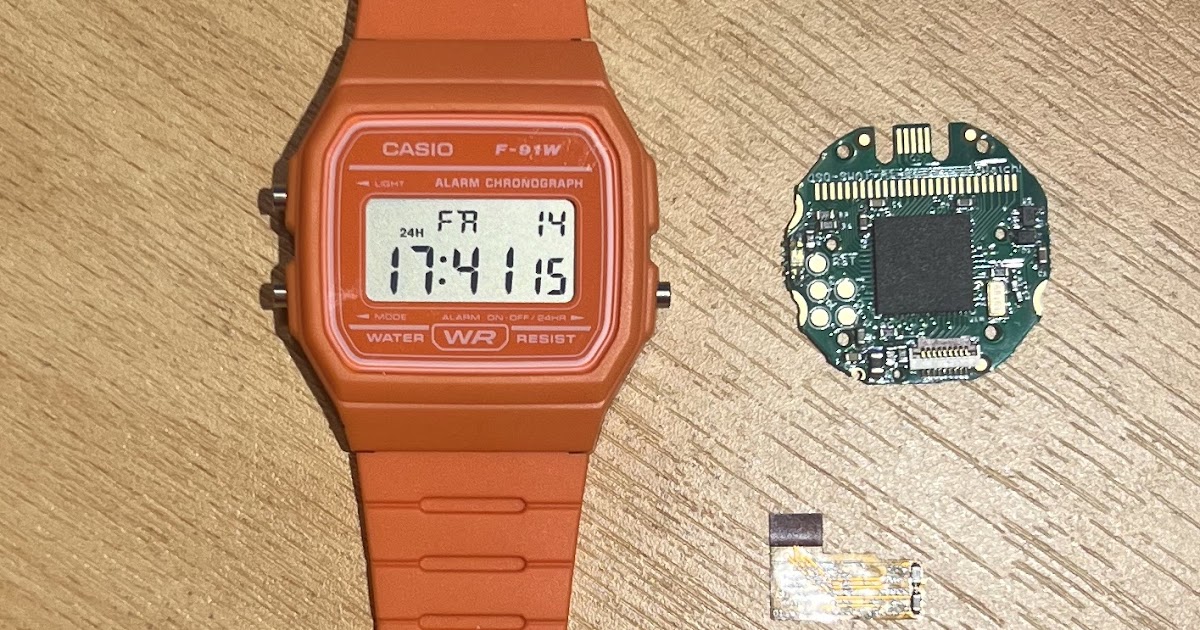
Here’s my Casio before working on it. Next to it is the new motherboard and the tiny sensor module which has a thermometer on it. With it the Casio can show the current temperature. It’s separate because the watch is intended to be hackable by allowing anyone to create a pluggable sensor module.

At the top of the motherboard you can see a tiny USB connector (it’s micro USB Type B) which is how new firmware gets flashed onto the device. More on that below.
The first step is to remove the back of the watch with a small screwdriver.

Then remove the rubber seal that keeps the watch watertight. I used small pointed pincers that came with my soldering iron.

At this point the entire module can be carefully removed.


Two things are needed next. The springy battery connector needs to be removed from the old motherboard; it pops off easily. And a little part needs to be unsoldered and re-soldered onto the next motherboard. Again, watch the video above for details of the soldering operation. I marked in the picture below where the little part was on the old motherboard and where it ended up.

After that it’s a small matter of putting it all back together. Once you’ve done that you’ll have the basic set of functionality from the Movement firmware. Here’s my completed watch showing the temperature: 29.8C. Yes, it was warm that evening.

But I don’t really want the phases of the moon or a second time zone, but I would like a stopwatch and other functionality. And I never want the Fahrenheit option on the thermometer.
So, next up is building firmware.
Changing the firmware
I modified the stock firmware from GitHub as follows:
- Removed Fahrenheit
- Removed 12 hour clock
- Made the sequence of watch faces be clock, countdown timer, stopwatch, pulsometer, temperature, temperature log, sunrise/sunset, preferences, set time.
Building and testing the firmware
To build the firmware you need the open source code from GitHub:
$ cd Sensor-Watch
$ brew install –cask gcc-arm-embedded
After that it’s just a matter of going to movement/make and running make
$ cd movement/make
$ make
$ brew install emscripten
With that installed you can rebuild the binary and run it using Python. It creates a local web server that serves a page emulating the watch.
$ make clean
$ emmake make
$ python3 -m http.server 8000 -d build
Then visit localhost:8000/watch.html to see and interact with the watch code you are working on.

Copying to the watch
Once you are happy with the code it can be simply copied to the watch. However, this requires dismantling the watch to access the micro USB connector. Here’s the board connected with a standard micro USB cable I had lying around.

The red circle shows the location of the tiny reset button. You connect the USB cable to a computer and click that reset button twice. The red LED on the other side of the board will pulse and the watch will appear as a volume on your computer called WATCHBOOT.

Once it’s appeared simply type
$ make install
to copy over the firmware. Then reassemble your watch.